
Thursday, September 29, 2011
Woo Hoo! I've hit 100 page views!
Keep them coming! I would love to have more followers, and more suggestions on the kinds of creations people would like to see. Requests are always welcome, and thanks for reading!

Wednesday, September 28, 2011
Customized Wine Glasses Tutorial
I wrote this tutorial for my friend Andrea over at Colorado Mama Chic. Since I haven't completed my next project, I thought I'd re-post it here. For now my projects may be a little farther apart than I would like, mainly because my son doesn't let me do much when he's awake and we're getting mentally prepared to move again. That means that crafting has to take a back seat a bit. That doesn't mean I won't be working on things, just that they will take me longer to complete, therefore my posts will take longer to come out. Hope you enjoy, and thanks for reading!
--------------------------------------------------------------
Personalizing Your Wine Glasses
I love the idea of, when you have people over, everyone knowing which glass is theirs. It makes for less dishes for me at the end of the night, and none of those embarrassing moments where a friend looks at you and says “Ummm…I think you’re drinking my wine.” Oops.
So, instead of buying those little wine glass markers that seem to always get lost or broken, I decided to customize my own wine glasses in such a way that they would both be visually pleasing and mark each individual person’s glass.
What you need:
 Steps:
--------------------------------------------------------------
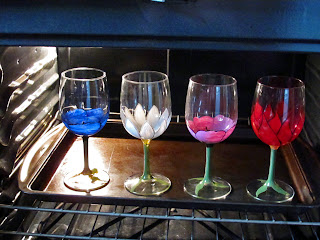
Personalizing Your Wine Glasses
I love the idea of, when you have people over, everyone knowing which glass is theirs. It makes for less dishes for me at the end of the night, and none of those embarrassing moments where a friend looks at you and says “Ummm…I think you’re drinking my wine.” Oops.
So, instead of buying those little wine glass markers that seem to always get lost or broken, I decided to customize my own wine glasses in such a way that they would both be visually pleasing and mark each individual person’s glass.
What you need:
- A design in mind. I chose flowers, where each flower is blooming up at you when you drink from your glass, but anything you like will do. These are, after all, your personalized glasses.
- A set of wine glasses. I got a set of 12 from World Market for $20.

- Acrylic craft paint (I used Folk Art Enamels by Plaid, but any acrylic paint that you can bake will do)

- Brushes in a variety of sizes
Steps:
1) Wash your glasses thoroughly. You don’t want to be picking bits of hair, dust, lint, etc. out of wet paint. Ick.

2) Once your glasses are completely dry, start painting! Just remember: whatever part you paint first is what will show on the inside of the glass, so if you are going for aesthetics inside and out, don’t plan on painting a lot of layers with different colors.

3) Place your wine glasses on a cookie sheet in a cool oven.
4) Set oven to 350 degrees F and allow to preheat. Once heated, bake for 30 minutes.

5) Allow glasses to cool in oven…I’d say an hour or so. The paint is setting one final time, so do not disturb!
6) That’s it, you’re done! You have a set of beautiful, customized wine glasses. Enjoy!


Wednesday, September 21, 2011
Glittering Monogrammed Fall Wreath Tutorial
I finally tackled my first wreath, and I had so much fun I may do one for every holiday/season. My husband will not be pleased to have to find the storage, but I love them! Assembly took about 20 minutes, the rest took about 15 minutes plus drying time. All told, depending on how thickly you layer the paint, about an hour to an hour and a half for this wreath!
--------------------------------------------------------------------------------------------------------------
Supplies:
 1 18" Grapevine Wreath
Fine Powdered Glitter in your choice of color (I used Recollections Extra Fine Glitter that I found in the scrapbooking department of Michael's)
Mod Podge or other Craft Adhesive
Glue Gun & sticks
Wooden Letter (for your personal monogram)
Fall Foliage of your choice (leaves, flowers)
Fall Fruit (I used Berries, Cranberries, a Pear and a Pumpkin)...make sure your glitter matches your fruit!
Jewelry Wire
Acrylic Paint
Small Paintbrush
Jewelry Crimping Pliers (Optional)
Jewelry Crimps (Optional)


4. Pull foliage off of its long stems. It's easier to place leaves, etc when you are working with smaller bits.

5. Lay out your foliage on the wreath until you find what looks best to you.

6. Use your hot glue gun to glue it all in place.
 8. Take your jewelry wire and cut 1-2 lengths approximately 20" long (If you are hanging an A, for example, you will only need one length. I am hanging an M, so I need two lengths)
9. Paint the other side of your letter. Before the paint dries, cover it with glitter. (I use paint because I don't glitter both sides, so it makes it blend in more)
 10. Tie the jewelry wire around the top of your letter and double knot the wire
11. Cover the wire with extra mod podge and glitter so that it blends with the outer face of the letter. Allow everything to dry completely.
12. Figure where you would like to hang your monogram. When you have placed it, weave the jewelry wire into the wreath so it is secure, then use the crimper and crimps OR tie and use the glue gun to secure in place. Be generous.

13. If you used the crimper, use the glue gun over the crimps for extra strength. Also use it at the top of the letter to attach it to the wreath.
Once everything is dry, you're done! Nice job!
--------------------------------------------------------------------------------------------------------------
Supplies:
 1 18" Grapevine Wreath
Fine Powdered Glitter in your choice of color (I used Recollections Extra Fine Glitter that I found in the scrapbooking department of Michael's)
Mod Podge or other Craft Adhesive
Glue Gun & sticks
Wooden Letter (for your personal monogram)
Fall Foliage of your choice (leaves, flowers)
Fall Fruit (I used Berries, Cranberries, a Pear and a Pumpkin)...make sure your glitter matches your fruit!
Jewelry Wire
Acrylic Paint
Small Paintbrush
Jewelry Crimping Pliers (Optional)
Jewelry Crimps (Optional)
- Cover half of each fruit with Mod Podge, then sprinkle the surface with glitter until covered.


2. When the first half has dried, repeat step one for the second half
3. For your monogram, first paint one side and outer edges with paint. Allow to dry.
4. Pull foliage off of its long stems. It's easier to place leaves, etc when you are working with smaller bits.

5. Lay out your foliage on the wreath until you find what looks best to you.

6. Use your hot glue gun to glue it all in place.
7. Now place your fruit. If it comes on a bunch of foliage, pull it off, it should have a long stem attached. Put your hot glue on the stem and slide it into place.

9. Paint the other side of your letter. Before the paint dries, cover it with glitter. (I use paint because I don't glitter both sides, so it makes it blend in more)

11. Cover the wire with extra mod podge and glitter so that it blends with the outer face of the letter. Allow everything to dry completely.
12. Figure where you would like to hang your monogram. When you have placed it, weave the jewelry wire into the wreath so it is secure, then use the crimper and crimps OR tie and use the glue gun to secure in place. Be generous.

13. If you used the crimper, use the glue gun over the crimps for extra strength. Also use it at the top of the letter to attach it to the wreath.
Once everything is dry, you're done! Nice job!
Wednesday, September 14, 2011
Shabby Chic Flower Headband Tutorial
I have to preface this tutorial by saying that I was inspired by the Tattered Flower Headband Tutorial I saw over at sew4home.com. However, when I tried to follow their instructions, which involve using a sewing machine to create the flower, I ran into some difficulty...so I decided to tweak it a little. Here you go...Have fun!
-----------------------------------------------------------------------------------------------------------

Iron & Ironing Board
Corresponding Thread
Needle
Scissors
Stretchy Headband
Coordinating Button
5. Continue folding and stitching through the bottom of the folds until the entire strip is folded accordion style and stays put with the thread running continuously through the bottom of all the pleats.
6. Spread out your pleats until the fabric is 1/3-1/2 it's original length. Knot your thread so that it cannot expand more. DO NOT CUT THREAD.
7. Begin "rolling" your folded pieces, keeping pleats in tact. Every 2-3 pleats, stitch through the bottom of the fold to attach it, in a roll, to the rest of the "roll." *
*Note...this is all about how you want it to look. I have yet to make 2 flowers that look exactly the same, and that's kind of the appeal. Just roll it as you would a cinnamon roll and stitch to keep it in place. It's all at your discretion.
8. Every once in a while, flip the "flower" over to look at the raw edges. These are what actually make up the base of the flower, so check to make sure you are achieving the look that you want. The stitches you are placing make up the base of the flower, where the "petals" grow out and up from.
9. When finished, the BOTTOM of the "flower" will look something like this. Remember: no two turn out the same, so it doesn't have to be perfect, as long as everything is secure and you are achieving the look you want. I always think the bottom of mine look a little funky.
10. This is the top of the flower. You can kind of see more of the "flower" when you look at it right side up.
11. Begin to spread the "petals" apart. When you find the beginning end of the fabric, you have found the center, which is your marker for the button.
12. Place your button in the center of the flower and sew on using the threaded needle that is still attached to the bottom of the flower. Again, DO NOT cut the thread...you will continue to use it to finish the project.* Repeat Steps 1-13 with remaining 2 strips of fabric.
*Note: if you use a standard 2 or 4 hole button, this is much easier. I happened to choose buttons with a single mount on the underside, which made it difficult to attach due to all the layers of the flower getting in the way.
13. Using your still attached needle and thread, sew your first flower on the headband. Placement is at your discretion (but I advise you put the seam in the headband at the bottom!)
14. Place your second flower uncomfortably close to the first and sew in place. When the headband stretches on your head they will spread out and look much better.*
*Don't be alarmed if your headband starts to twist at this point...it's normal and will smooth out when you wear it.
15. Repeat step 14 with the remaining flower. See how the headband starts to bend? Totally normal.
16. If you're like me, and you like the shabby chic look but not to the point of it looking really ragged, trim off the threads that have started appearing all over the raw edges.
-----------------------------------------------------------------------------------------------------------
Shabby Chic Flower Headband Tutorial

Supplies Needed:
3 2" X 44" pieces of fabric (use scraps...you can sew them together using 1/4" seam allowances)Iron & Ironing Board
Corresponding Thread
Needle
Scissors
Stretchy Headband
Coordinating Button
- Fold each end of each strip of fabric in (wrong sides together) 1/4". Press
2. Fold each strip of fabric in half lengthwise. Press.
3. Starting at one end, begin accordion-folding the fabric. You will want the long pressed edge to be at the bottom, and make the bottom as even as possible.
4. Thread your needle with a LONG piece of thread (when ends are brought together and knotted, you will want this to be at least 30 inches...it's easier to cut thread off than to have to add more). Insert the needle as close to the bottom edge of the accordion folds as possible. Pull through.
5. Continue folding and stitching through the bottom of the folds until the entire strip is folded accordion style and stays put with the thread running continuously through the bottom of all the pleats.
6. Spread out your pleats until the fabric is 1/3-1/2 it's original length. Knot your thread so that it cannot expand more. DO NOT CUT THREAD.
7. Begin "rolling" your folded pieces, keeping pleats in tact. Every 2-3 pleats, stitch through the bottom of the fold to attach it, in a roll, to the rest of the "roll." *
*Note...this is all about how you want it to look. I have yet to make 2 flowers that look exactly the same, and that's kind of the appeal. Just roll it as you would a cinnamon roll and stitch to keep it in place. It's all at your discretion.
8. Every once in a while, flip the "flower" over to look at the raw edges. These are what actually make up the base of the flower, so check to make sure you are achieving the look that you want. The stitches you are placing make up the base of the flower, where the "petals" grow out and up from.
10. This is the top of the flower. You can kind of see more of the "flower" when you look at it right side up.
11. Begin to spread the "petals" apart. When you find the beginning end of the fabric, you have found the center, which is your marker for the button.
*Note: if you use a standard 2 or 4 hole button, this is much easier. I happened to choose buttons with a single mount on the underside, which made it difficult to attach due to all the layers of the flower getting in the way.
13. Using your still attached needle and thread, sew your first flower on the headband. Placement is at your discretion (but I advise you put the seam in the headband at the bottom!)
14. Place your second flower uncomfortably close to the first and sew in place. When the headband stretches on your head they will spread out and look much better.*
*Don't be alarmed if your headband starts to twist at this point...it's normal and will smooth out when you wear it.
15. Repeat step 14 with the remaining flower. See how the headband starts to bend? Totally normal.
That's it, you're done! Wear your new headband and wow people with your crafting skills!
Saturday, September 10, 2011
Hanging Makeup Bag Tutorial (tutorial in link)
It's done! It's done! Although this was tough for me (mainly because of the fabrics, sorry sis), that just means that I'm even prouder of it than most of my projects. Something that challenges you always gives you such a strong sense of accomplishment when it's done!
If you are interested in making this bag, Please read the entire introduction. I'm very proud of this, and extremely proud that I created it and the tutorial. I don't care if you make and sell them, as long as you give me credit for the pattern, but please, please, please don't claim the pattern and tutorial as your own. I worked hard on it, and I would be very upset to find it somewhere else listed as created by another person.
With that being said CLICK HERE for the tutorial, complete with the one pattern piece you will need to complete the bag. If you have any questions, message me and I'll do my best to help. Thanks!

It's huge, 50" long plus the extra mesh bag...holds a LOT of stuff!
When closed it almost looks like a binder cover...14"wide and about 12" long.
Does anyone have tips about working with unfamiliar fabrics? I had difficulty with suede...and I'm sure it won't be the last fabric that I am challenged by!
Thursday, September 8, 2011
All Fabrics Are Not Created Equal
This is important to remember, and although I knew this to be true, I'm now experiencing it for the first time.
 I am making a makeup bag for my sister. It will be pretty darn cool when it's finished, and I'll post a tutorial (if I ever get it together). However, letting her pick the fabrics has been both a blessing and a curse. She is very methodical in her choices, and everything has rules. Therefore, when I told her to stick to the 100% cottons because I am most comfortable working with them, she ignore my suggestion because her "rules" of aesthetics made it so she could not pick 3 cottons that "went together" and that she liked. Instead, she chose 2 cottons...and suede. First off, suede is expensive. Fine, it's her project. HOWEVER...suede moves a lot more than cotton does.
For example...cotton, when you fold it and finger press it, will stay in place. You are able to pin it, and sew it, and be fairly confident that it will stay where you want it and look how you want. Suede likes to play little tricks, like sliding around while you are trying to pin it or sew it and then you end up with slightly wavy lines instead of nice, crisp, straight lines like you do with cotton.
Sued also doesn't like to be pressed in place...it can say "oh, yes, I'll hold that crease for you," and then promptly ignore what it just said and unfurl again.
Needless to say I'm having a challenging time. My suggestion is, when you are sewing with a fabric you are not familiar with , RESEARCH IT FIRST. I tried to encourage her to go a different route, but she wouldn't have it. Now I'm in a battle of wills with Suede, and I'm afraid he's winning...

Tuesday, September 6, 2011
The Crochet Hook Clutch
I was crocheting so much that it created another sewing project! Click on the link to get the tutorial...it's surprisingly easy and, with the right fabrics, super fun and cute!
---------------------------------------------------------------------


I'm to the point now where I have a lot of crochet hooks, markers, and yarn needles just floundering about. Being as organizationally obsessed as I am, this just wouldn't do. But (as with so many other things) I couldn't find a crochet hook case that a) met all of my needs and b) looked good enough for me to actually use. Then I found the Crochet Clutch at the Moda Bake Shop and fell in love. It's perfect! With a pin and needle keeper, pockets for all my hooks to be stored individually, and a clear zippered pocket for my odds and ends, it has everything I need! Not to mention that I like the look of it since I got to pick the fabric for myself instead of just going with thehideously, heinously ugly fabrics that someone else chose that contradict every bit of style sense I have just aren't my taste. Plus it comes with a handy dandy handle, which is just an added bonus!
---------------------------------------------------------------------


I'm to the point now where I have a lot of crochet hooks, markers, and yarn needles just floundering about. Being as organizationally obsessed as I am, this just wouldn't do. But (as with so many other things) I couldn't find a crochet hook case that a) met all of my needs and b) looked good enough for me to actually use. Then I found the Crochet Clutch at the Moda Bake Shop and fell in love. It's perfect! With a pin and needle keeper, pockets for all my hooks to be stored individually, and a clear zippered pocket for my odds and ends, it has everything I need! Not to mention that I like the look of it since I got to pick the fabric for myself instead of just going with the
Monday, September 5, 2011
Zig Zag Baby Blanket
This is such a cute blanket when finished! It's the first one I've made that has 3 skeins of yarn going at the same time, continuously. It's not as difficult as I thought it would be, but definitely not super fun either!


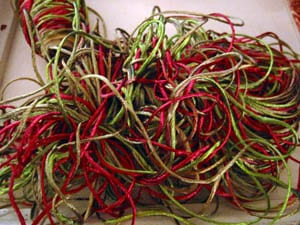
Were I to make it again, I would try to add some nicer edging. I feel like the straight edges look unfinished...and I'd want to spruce it up a bit. But, overall, I'm very proud of how it turned out, especially since there were times that I felt my yarn looked like this:
Now that I've made it (and know that I can do it) I am selling it over at Etsy. It's $30.00 plus shipping.
Saturday, September 3, 2011
Amy Butler's Everything Bag
Wrote this one a couple of weeks ago. I went bonkers and decided that I needed a SECOND diaper bag that my husband just might be willing to hold for a couple of minutes, and this is what I chose.
---------------------------------------------------------------------
 The next project I tackled is Amy Butler's Everything Bag from her book Little Stitches for Little Ones. I wanted a second diaper bag that was a little more neutral in print than the Modern Diaper Bag I made last year. I love that bag, but sometimes it's either not big enough or the print just isn't really what I'm wanting that day. Plus, there's a slight, minuscule, infinitesimal chance that Captain Caffeine might be willing to hold it for me, which would be a huge bonus!
I had a MUCH easier time with this one than I did with the Modern Diaper Bag.For one, I think that since I had already worked with a pattern from this book I was much more prepared for how it is written, and I knew to pay specific attention to every detail in each step. I also knew to get heavy duty needles, so I didn't have to deal with nearly as many breaking. I love that this bag has both exterior and interior pockets, and that the interior pockets have elastic at the top...nothing's going to fall out of those easily!
 The only difficulty I really had was in attaching the lining sides to the bottom. That's because the
 dang murtherf*rking stupid a$$ very stiff center divider makes manipulating the ends of the fabric difficult...I just couldn't get it to lay flat enough to get a nice, straight seam. At least it was only the lining!
Suggestions for this? Not many.
---------------------------------------------------------------------
 The next project I tackled is Amy Butler's Everything Bag from her book Little Stitches for Little Ones. I wanted a second diaper bag that was a little more neutral in print than the Modern Diaper Bag I made last year. I love that bag, but sometimes it's either not big enough or the print just isn't really what I'm wanting that day. Plus, there's a slight, minuscule, infinitesimal chance that Captain Caffeine might be willing to hold it for me, which would be a huge bonus!
I had a MUCH easier time with this one than I did with the Modern Diaper Bag.For one, I think that since I had already worked with a pattern from this book I was much more prepared for how it is written, and I knew to pay specific attention to every detail in each step. I also knew to get heavy duty needles, so I didn't have to deal with nearly as many breaking. I love that this bag has both exterior and interior pockets, and that the interior pockets have elastic at the top...nothing's going to fall out of those easily!

Suggestions for this? Not many.
- I would consider making the divider slightly shorter. That way not only is it easier to do the edge and top stitching at the top of the bag, but it just seems like aesthetically it's more pleasing.
- I would also make the straps longer...easier to get over your shoulder. Although it's very functional this way...I just think that, with how large the bag is, it will be on my shoulder more than just in my hand or over my lower arm.
- I would also use less elastic, even if it makes installing the pockets more difficult. At the length the pattern calls for, I might as well not even have elastic pockets, since they don't have to expand at all to get items in/out of the pockets.
---------------------------------------------------------------------
All in all, I love this bag. If I were to make it again, I would definitely use my suggestions above, with possibly the exception of the divider...I guess it would depend on my mood!
Friday, September 2, 2011
3-in-1 Shopping Cart Cover
A few weeks ago I finished a shopping cart cover for my son...here's the post!
------------------------------------------------------------------
 This week I finished monkey's Shopping Cart Cover. I used a McCall's 3-In-1 Shopping Cart Cover Pattern that I bought onEtsy.com. I will say that, while the pattern is fairly easy to follow, there were times that I was a bit confused, and as a result the finished product is SLIGHTLY messier than I would have liked.
I disappointed myself in a couple areas. I cut the leg holes too early...therefore they were a bit too big and the space between them narrower than I would have liked.
I misunderstood the instructions for the casing for the elastic, and made the space too narrow. As a result I had to rip out sections of my casing seam and re-sew it so that there was enough room for the elastic to slip through...not fun.

I would also suggest a couple of modifications to this pattern:
------------------------------------------------------------------

I disappointed myself in a couple areas. I cut the leg holes too early...therefore they were a bit too big and the space between them narrower than I would have liked.
I misunderstood the instructions for the casing for the elastic, and made the space too narrow. As a result I had to rip out sections of my casing seam and re-sew it so that there was enough room for the elastic to slip through...not fun.

I would also suggest a couple of modifications to this pattern:
- When cutting the material for the binding, I would suggest making it slightly wider (by about 3 inches total...prior to cutting it would be 9 inches wide, and when you cut it down it would be a 3 inch wide strip). That would make the finished binding about 3/4 inch wide, which is easier to work with, especially if you cut the leg holes too early like I did and they are uneven. I would also add about 3-4 inches in length to the binding, just in case.
- I would wait to cut the leg holes until all the layers are sewn together and right side out, that way you can be sure the placement and size will be where you want it on the finished product.
- Make the casing for the elastic about 3/4 inch wide instead of 1/2 inch wide...it makes it easier to thread the elastic through, especially because you will be fighting with batting.
- If you choose to cut the holes and make the strap, note that the pattern doesn't tell you when to do this, so you just have to know to do it yourself. I did that step last. Also, I would suggest NOT sewing the male end of the buckle onto the strap, that way you can tighten it around baby and keep him/her more secure. I'm going to rip out that part of sewing so that I know Monkey is REALLY in there.

Subscribe to:
Posts (Atom)