I've been wanting to make my girls a special bed for a while now. I really wanted them to have a dog "couch," but you have to pay an arm and a leg to buy one, and even then I couldn't find anything that was what I really wanted.
I apologize in advance for the pictures...for some reason I had a lot of trouble with them. Blogger wouldn't let me center them as I wanted to, and it rotated some of them (even though they are not rotated on my computer). Sorry!
As many of you know, a huge trend right now is to make dog beds out of old suitcases. I personally love this idea, and wanted to give it a try! This will work with any hard-sided suitcase, all you need is a little elbow grease (and some true determination at points). This way you get exactly what you want, and if you have some of the materials at home it can be pretty darn cheap...other than the polyfill (because I made my bolsters big) I spent about $35. Here you go!
--------------------------------------------------------------------------------------------------------
Materials Needed
- Old, hard-sided suitcase (I picked up an old Samsonite Suitcase for less than $3 at the local Goodwill)
- Painter's Tape
- Tarp
- Rustoleum Spray Paint for Plastic in color that you want the suitcase to be (only works if you have plastic suitcase, otherwise get the type of paint needed for the material you are working with)
- Drill w/assortment of drill bits
- Piece of scrap wood...I had a 2x2 sheet of 1/2" birch
- Wood screws & coordinating washers in the appropriate size (mine were 1/4" in diameter and the screws were 1" long...total of under $2 for the hardware) (If adding feet)
- Ratchet set or screwdriver (you can also use your drill with a screwdriver bit). These are used to attach the feet.
- Bun Feet...finished or unfinished. (optional, but I think it adds a nice touch. I found mine at This Shop on Etsy for $12 for all 4)
- Hot Glue Gun and Embellishments (optional)
- Home Decor Fabric...I purchased 2 yards
- Coordinating Thread
- Sewing Machine, Rotary Cutter, Mat, etc (Your normal sewing tools)
- Zipper Foot
- Coordinating Zipper that is the approximate width of the suitcase (longer is better than shorter, even though my bed was only 25" wide I got a 30" zipper)
- Polyfill (for the size I made, 44-56oz is plenty)
- Fabric Glue (spray or liquid) (optional)
- 2 layers foam (2" thick) cut to the size of the inside of your suitcase
- Batting cut to same size as foam (optional)...cut as many layers as you want, or skip it altogether!
For the purposes of this tutorial, RST=Right Sides Together and WST=Wrong Sides Together. Right Side refers to the side of the fabric with the print showing, and Wrong Side is the back side of the fabric without the print.
Also, 1/2" seam allowances throughout.
Construction
- Take apart your suitcase. This varies with the type of fasteners used. Some suitcases simply use pins, others rivets. You'll just have to see what the fastener is and remove accordingly. My Samsonite Suitcase was held together with small rivets, which I drilled out. Here's a How-To
- Now take your painter's tape and tape off any parts of the suitcase that you do NOT want painted. I chose to keep my metal parts in-tact (at least the ones that would show on the finished product).
- In a WELL VENTILATED AREA, spread out your tarp. Lay your suitcase on the tarp, and paint away! Make sure to use even strokes, and let dry approximately 10 minutes in between coats. I used 2 coats, and let dry 24 hours before continuing on to step 4. I also painted my Bun Feet and the inside of my suitcase at the same time.

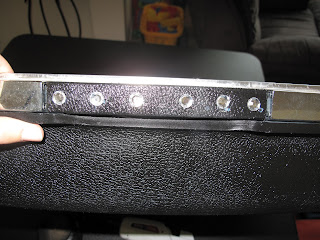
- Now it's time to drill some holes! I love drilling. It's therapeutic for me. Because you will be drilling through plastic, you need to be careful, because it can crack. Thanks to my father, I had no trouble! He gave me the following tips:
- Once you have marked where your holes will be, lay your piece of wood on a firm surface (Think packed dirt, NOT Concrete).
- On top of the wood, place your suitcase...you want the flat surface directly on the wood, so you will be drilling on the INSIDE of the suitcase.
- When you know the size bit you need, mark your places and carefully drill through the plastic...the wood is there to stabilize and to "catch" the bit once you break through. I followed those tips and was 100% successful!

- Now, if you want to, embellish your feet, the suitcase, whatever! I chose to hot-glue some "bling" to the feet and the handle of the suitcase.

- Once the embellishment is done, you can attach your feet. Place the feet where you want them, thread the screw through the washer, then through the suitcase (from the inside) and tighten into the feet. My screws required a ratchet set, but whatever works for you is fine! I also purchased bun feet with pre-drilled holes, so that determined the size of screws and washers I needed as well as how large the holes I drilled in the suitcase were.

- On to Sewing!!! For this you will need to cut 14 different pieces: top and bottom, front (think long and skinny), 2 sides, above & below zipper in back (2 pieces), either side of zipper (2 pieces), 2 circles (for ends of the bolster), 2 bolster sides, and one bolster back. My Foam (cut to fit into my suitcase) is 25"x19", so the dimensions I used are:
- Top & Bottom: 2 26"x20"
- Front: 1 5"x26"
- Sides: 2 5"x20"
- Above & Below Zipper: 35"x2 3/4"
- Either Side of Zipper: 2 5"x5"
- Bolster Ends: 2 6"x6" (cut into a 6" diameter circle)
- Bolster Sides: 2 18 7/8"x20"
- Bolster Back: 1 18 7/8"x26"
- You want your pieces for the main portion of the bed to be 1" bigger in each direction than the width/length of the bed itself. For Example: If your bed is going to measure 25X19X4 (as mine will be), then my top and bottom panels should be cut to be 26X20 and my side panels should be 20X5. For the bolster, you want the ends to be 1" Wider than the desired DIAMETER of the bolster, and the sides/back of the bolster should be 1" longer than the side of the bed it is attaching to and 1" wider than the CIRCUMFERENCE of the bolster end. So, if I want my bolster to be 5" in diameter, I should cut the bolster ends to be 6" in diameter, and my bolster sides should be about 18 7/8" wide by 20" long (because that is how long the sides of the bed are +1"). To calculate the width of the bolster sides/back cut, plug in the diameter of your bolster end HERE and it will tell you.

- Install Zipper: I always do this first because it will help to determine whether or not the side panels need to be shortened (if your zipper is longer than the back).
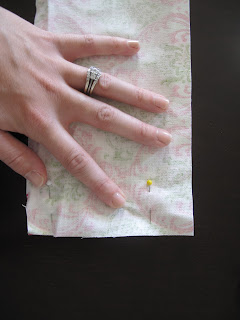
- Fold the small pieces of fabric for either end of the zipper in half, RST. Press a crease with your finger.
- Open them back up, and place the crease as CLOSE as possible to either end of the zipper with the Right Side of the fabric against the zipper (see picture).

- Sew in place along the crease: re-fold. You should now have the right side of the fabric showing on the outside of the zipper (see picture).

- Now take the piece that goes above and the zipper and place it, right side down, on top of the zipper, lining up the top edge with the top of the zipper fabric.
- Using a zipper foot, sew in place, making sure your stitches are as close to the zipper itself as possible.
- Now fold it so that the right side is showing and you can see the zipper. Topstitch it in place if you wish...but it is not necessary.
- Repeat with the piece that goes below the zipper...Viola! Your zipper is installed.

- Now...does your zipper go beyond the ends of your foam? Mine did, because the back of my foam was 25" and my zipper was 30". It's ok, it actually makes inserting the foam easier. Shorten your side panels accordingly so that (after your "ring" is sewn) the total circumference of the ring equals the length of all 4 sides of your foam combined.
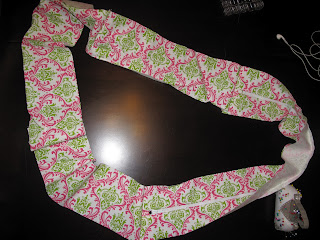
 |
| Sorry the pic is sideways, I don't know why... |
- With RST, attach the side panels to either end of the installed zipper. Attach the front panel in the same manner; you should now have a "ring" with the zipper along one long edge, with all fabric right sides on the same side.
- Now time to attach the BOTTOM panel. With RST, pin the "ring" to the bottom panel and sew in place.

- Before attaching the top panel, we need to make the bolster.
- First, take the bolster sides and pin them, RST, to the bolster back along the short ends (one on either end of the bolster back). The only reason I have these as separate pieces is that I didn't want to have to buy extra yardage to get the full length of the bolster.

- Stitch in place.
- Now...RST, pin the bolster ends to the free ends of the bolster sides, matching raw edges. Stitch in place. You will now have one LONG raw edge still exposed.
- Attaching the bolster and top panel to the constructed "couch" bottom. This can get a little tricky.
- First, turn your bolster right side out. Match the long raw edge of the bolster to the raw edge of the constructed bottom, RST (you want the right sides of the bottom on the "inside" of the couch). Make sure the bolster back is on the same edge as the zipper.
- Now place the top panel on top of all of it, RST (all you will see at this point are the wrong sides of the constructed bottom and the wrong side of the top).

- On the sides and back of the couch, match ALL raw edges (bolster, bottom, and top). At the front you will match the raw edges of the top and bottom, but not the bolster because it shouldn't be there!
- Starting in the back, stitch around, leaving a 6" gap open in the back (you will need this to stuff the bolster).

- If you would like, top stitch around the end panel of the bolster and along the front (top stitching the top panel and front panel together). This gives it a more "finished" and "couchy" look, but is by no means required!


- Now...Turn it Right Side Out through the zipper. Stuff your bolster with Poly Fill to the desired fullness...turn wrong side out again. Pin the opening that you stuffed the bolster through shut and stitch shut. (I had to hand stitch this because all the stuffing wouldn't allow me to put the bed in the sewing machine...and once I was done I wished I had stuffed it more!
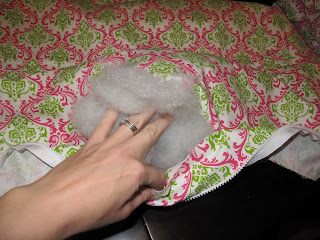

- IF you choose, use the fabric glue to seal the two pieces of foam together. Top with the layer(s) of batting...you can glue these to the top if you wish.
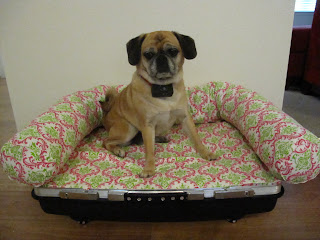
- Turn Right Side Out (through the zipper), insert foam into the body of the "couch," and place the couch in your finished suitcase. It should fit snugly. All Done!


Please feel free to message me with any questions. I've done the best I could to add pictures to help, but I know that sometimes the pictures just aren't enough and more explanation is necessary. Thanks!
.JPG)
.jpg)
.jpg)
.JPG)


