Thursday, December 29, 2011
Wednesday, December 28, 2011
Aviator Cap
I follow this wonderful woman on blogger named Amy over at Nap Time Crafters. She has a ton of great tutorials, mostly for baby, but some for herself as well. She doesn't have all tutorials, though, she also has a pattern shop where you can buy the patterns for some truly great products!
I have purchased both her Aviator Cap and her Newsie Cap, but so far have only made the Aviator Cap because, well, it's winter and the Newsie Cap isn't the warmest hat in the world.
A word of warning...measure, measure, measure! I made one that was supposed to be 19 inches, but it turned out to be 21 inches because apparently my half inch is less than her half inch, and when you're using half inch seam allowances it's important! That's OK though, because Monkey isn't done growing, and while it works this winter (aka it's not falling off his head) it should fit PERFECTLY next winter.
Here's a pic of what hers looks like:
 And here's what my finished product looks like. No, the right ear flap is not smaller than the left, it's just how it was laying on the table at the time:


I have purchased both her Aviator Cap and her Newsie Cap, but so far have only made the Aviator Cap because, well, it's winter and the Newsie Cap isn't the warmest hat in the world.
A word of warning...measure, measure, measure! I made one that was supposed to be 19 inches, but it turned out to be 21 inches because apparently my half inch is less than her half inch, and when you're using half inch seam allowances it's important! That's OK though, because Monkey isn't done growing, and while it works this winter (aka it's not falling off his head) it should fit PERFECTLY next winter.
Here's a pic of what hers looks like:


Wednesday, December 21, 2011
Pinecone Elf on a Shelf
 |
| These are |
A couple of suggestions:
- If you don't want to buy the acrylic paint (or you don't have any) for the cheeks, use pink eye shadow. I used a small eye shadow brush, wet it down a little, and dipped it in the eye shadow. Then I just dabbed it on! I felt like I had more control over it, plus, since I have a whole eye shadow palate, I had a lot of shades of pink to choose from
- When you get everything cut and sewn as you want it, use your hot glue gun to secure them in place. That way you don't risk them falling off at inopportune moments!
- Skip the bell/bead/ball on the hat. I didn't really care for it, and it's an unnecessary expense unless you already have them around the house.
Enjoy!
 |
| These are mine, complete with the "village" I put out every year |

Wednesday, December 14, 2011
Christmas Card Garland Tutorial
I've seen several versions of the Christmas Card Garland online, but all of them seem so specific. I wanted something that gave a little more freedom with how it's constructed, while still looking beautiful. So here's my version, hopefully you all like it!
-----------------------------------------------------------------------------------------------------------------------------


-----------------------------------------------------------------------------------------------------------------------------
Christmas Card Garland


Supplies
- Wide ribbon...you can use wired or unwired, festive or plain. I would suggest 2-3" ribbon, just for stability and to get a real feel for the "backbone" of your project.
- Thin ribbon-I use this to make the "hangers" along the ribbon and at both ends
- Wood Clothespins. I got a pack of 24 from AC Moore for just under $3
- Scrapbook Paper...make this as plain or fancy as you want. You can use holiday themed or whatever suits you. (Optional, you can skip this step if you just want plain painted clothespins)
- Paint...Whatever you think is going to work best to paint the clothespins, in colors that you like and that go with the feel of your project
- Mod Podge-I used the gloss
- Foam Brush
- Small Paint Brush(es)
- Hot Glue Gun
- Scissors
- Pen/Pencil
- Waxed Paper (to make clean up easier)
- Embellishments that will fit on your clothespin (optional)

Construction
Step 1: Lay down a piece of waxed paper that is big enough to fit all of your clothespins. Paint your clothespins in your selected colors. You need to make sure to paint one "face" (the flat side), the small ends, and the two sides where the pieces of the clothespins come together. Whatever you feel will show. You only need to paint one "face" because the other one will be covered with scrapbook paper (or not, if you choose to skip that step). Make sure to do enough coats to achieve the color you want (I used 2 coats). If you are not using the scrapbook paper, skip to step 4.


Step 2: When your clothespins have dried, lay the "face" of one on the wrong side of the scrapbook paper. Trace around the edge of the clothespin, getting as close as possible. Cut out your piece of paper. Repeat for all clothespins.

 |
| Trace Around Clothes Pin |

Step 3: Mod Podge your scrapbook paper pieces onto the unpainted face of the clothespins. Using the foam brush, put a layer of mod podge on both the clothespin and the wrong side of the paper. Place the paper on the clothespin, mod podged sides together, and line up edges. Make sure to press down the paper well and keep rubbing it so that bubbles don't form. When you are sure that the paper is on there to your liking, use the foam brush to put a layer of mod podge over top of the paper...it will dry clear.


 Step 4: After Mod Podge has dried (I would give it overnight, it can stay a bit tacky for a while)Hot glue your embellishments to your clothespins (on top of the scrapbook paper, if you used it). I chose to use "jewels" for my embellishment, just to give it more bling. I have seen buttons, felt bows, little Christmas Trees, berries, etc. used. Just go with what feels right to you...even if that's not putting anything on there!


Step 5: Cut your wide ribbon to the length you need. I chose to make mine about 2 1/2 yards long, so that it would hang where I wanted and still have a bit of "swag."

Step 6: Cut lengths of your thin ribbon 4" long, as many as you need to achieve the swag you want. I didn't want my swag to be too long, so I cut 4 lengths. Hot glue the thin ribbon to the back of the wide ribbon at evenly spaced intervals. On the ends, make sure to fold the end of the thick ribbon back over the thin, so that raw edges don't show.


Step 7: Hot glue the BACK of each clothespin to the FRONT of the thick ribbon. Space them however you like. I tried to be as even as possible, because I'm a little OCD that way.


YOU'RE DONE! I used command hooks to hang my garland from the counter that divides my living room from my kitchen. I love these because they are barely noticable, and come off clean.
Enjoy!
Wednesday, December 7, 2011
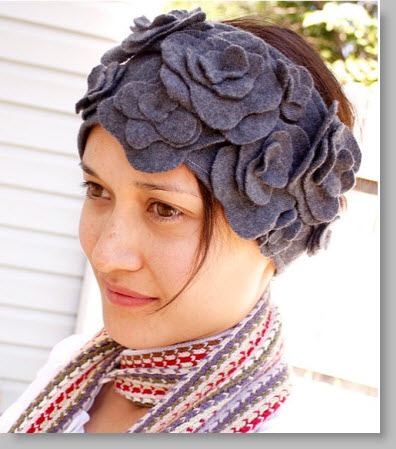
Stylized Ear Warmer
So, I found this great ear warmer tutorial over on Pinterest. One version of the finished product looks like this:
.JPG) I love this. It's easy, it's fast, and it's a great gift!
I love this. It's easy, it's fast, and it's a great gift!
Here's what my finished product looks like:

I liked the look of one big flower on there. Of course, the picture isn't the best because it's not in natural light, but you get the general idea.
If you're interested in it, here is the link to the original tutorial over at Delia Creates. (OK, it's a link to her simplified tutorial, but she also links to the first tutorial on there if you're interested.)
I made this one as a gift, but I liked it so much I just may make one for myself as well!
.JPG)
Here's what my finished product looks like:

If you're interested in it, here is the link to the original tutorial over at Delia Creates. (OK, it's a link to her simplified tutorial, but she also links to the first tutorial on there if you're interested.)
I made this one as a gift, but I liked it so much I just may make one for myself as well!
Sunday, December 4, 2011
Coming Soon: December 2011 Edition
This month will NOT be all tutorials (sorry). We're busy, as everyone is this month, so some things will just be examples of what I have made. If I have made one item off of a tutorial and NOT off of a pattern that I bought, I will be sure to include a link. Oh, and the pictures here are EXAMPLES of what the finished product could look like. I will include pics of the ones I make in the actual posts.
Wednesday, Dec 7: Gift Idea...Stylized Ear Warmer


Wednesday, Dec 7: Gift Idea...Stylized Ear Warmer
Wednesday, Dec 14: Christmas Card Garland Tutorial
Wednesday, Dec 21: Pinecone Elf on a Shelf
Wednesday, Dec 28: Winter Aviator Hat! (Boy Version)
Subscribe to:
Posts (Atom)