
Monday, October 31, 2011
Happy Halloween!
My son painted one of these. Mine are not the best representation of my work, but I only had an hour and had to let the white paint dry before I could paint the lettering. I just keep thinking "One of these things is not like the other..."

Wednesday, October 26, 2011
Table Runner Tutorial
I made this runner specifically for the fall. I will say that I wish I had made it about 5 inches longer, but it still looks pretty good. I am making a matching one for my dining room table as well. This runner is 55" long and 16"wide. All instructions are written for those measurements, but it shouldn't be hard to convert them to whatever size you want.
--------------------------------------------------------------


-Using a crochet needle or other object like a pencil, tie the folded end in a knot (see picture)


Step 6: Pin front panel to back panel, right sides together. You want to make sure your tassels are centered on the end points, with the part that will be showing in between your two layers of fabric.


--------------------------------------------------------------
Table Runner Tutorial


Supplies:
-Patterned fabric to run 1" longer than the desired length for your runner (for example, for this runner I wanted it to be 55" long, so I needed 56". I bought 1 5/8 yards.
-Same amount in corresponding fabric for backing and side panels (your runner will NOT be the width of the fabric, so you'll have plenty).
-Thread
-2 Packs DMC Embroidery Floss
-Cutting Mat & Rotary Cutter (unless you really want to cut all of this by hand)
-Measuring tape or ruler/straight edge
-Sewing Machine

Step 1: Cut your Fabrics. The patterned fabric panel should be 56"x13". The backing panel should be 56"x17", and the two side panels should be 56"x3".
Step 2: Attach side panels to main patterned panel. With right sides together, pin the 3" side panels lengthwise on the main patterned panel. Sew in place. I would suggest reinforcing this by using a heavier stitch. All seams have 1/2" seam allowance.

Step 4: Cut your end angle. Fold main panel in half once, then again in the opposite direction (so once hot dog, once hamburger). Using your straight edge and rotary cutter, (and making sure you're cutting the ENDS of the fabric) cut your angle, making sure that the folded edge is the long point and the raw edges are the short point. That way your runner will come to a point in the middle of each of the ends.

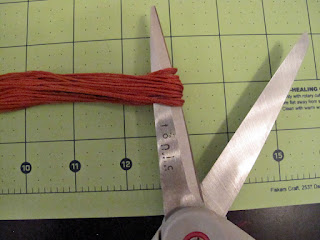
Step 5: Make your tassels. With each pack of embroidery floss, do the following: -Cut ONE end of the floss so that you have one end that is still folded and one end that is all "ends." Remove any short threads...there will be at least one.

-Remove 6 threads from your pack


-Pull the remaining 6 threads through the loop you have just made and tie another knot at the top of the loop. This will be the section that is attached to the runner end.


-Trim ends if desired

 |
| The part of the tassel you see is the 6 strands that are the attaching point, NOT the main body of the tassel |
Step 7: Trim back panel to match front (and vice versa if needed). I had to trim the back panel for the angles, and the front panel so that all raw edges were even.

Step 8: Sew around perimeter of runner, leaving one side of one pointed end open for turning. Trim tassel ends so that about 1" is still inside the runner once turned.

Step 9: Press all edges. Turn the edge you left open inward 1/2", press and pin in place. Top stitch around entire perimeter of runner.
You're done! You can use this tutorial to make a simple runner at any length you desire. Enjoy!
Tuesday, October 25, 2011
Coming Soon: November 2011 Edition
It's that time again: Time to preview next month's projects. I'm crafting a lot, but since we have a rather lengthy move coming up, I'm stockpiling a lot of crafts to post during the time when I'm not able to make anything new.
So, for November 2011:


So, for November 2011:
November 2: Sewing Machine Pin Cushion Tutorial

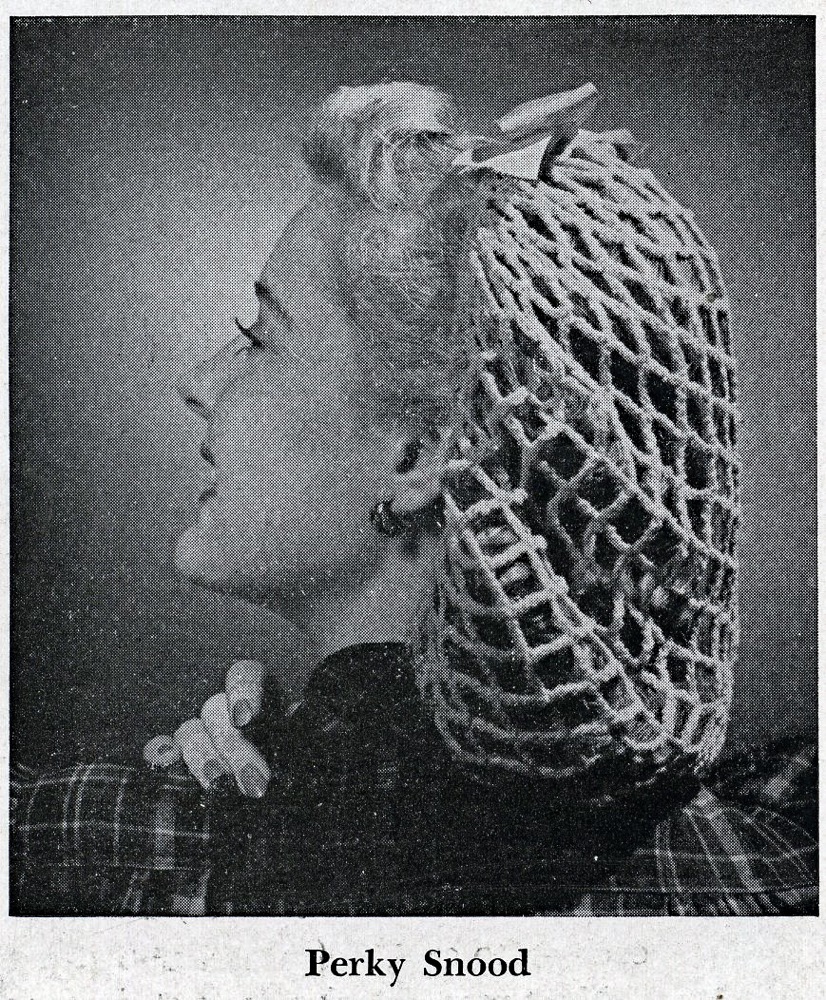
November 9: Retro Flashback: Make Your own Snood Tutorial
November 16: Fabric Bin Tutorial

November 23: No craft, Thanksgiving instead!
November 30: My Son's Baby Quilt (hopefully). If it's STILL not done, I'll have to come up with something else!
Wednesday, October 19, 2011
Ribbons and Spiders Halloween Wreath
I really want to start decorating the house for Halloween this year. Something about having a kid makes you want to make a big deal out of any and all seasons/holidays/events...anything. I found this tutorial for a Halloween Wreath with Spiders that I thought provided a great foundation for what I wanted, but it makes you run to a couple different sites to put it together, and I wanted to put my own special twist on it. Because of that, I'm going to do the entire tutorial here so that it's all in one place and includes my own take on it. Enjoy!
-------------------------------------------------------------

Supplies:
1 Styrofoam Wreath (I got an 18" wreath)
Orange Ribbon at least 7/8" wide. (I ended up having to get 4 rolls of this. I got the Celebrate It Basic Basic Ribbon from Michael's. I suggest getting wider ribbon...the wider it is the less you will need.)
Sparkly Orange Ribbon at least 7/8" wide. (I ended up having to get 4 rolls of this. I got the Celebrate It Basic Basic Ribbon that sparkles from Michael's)
Thin Black Ribbon (The other tutorial specifies fringe ribbon. I just got 2 kinds of thin ribbon because I didn't like any of the fringe ribbon I saw, one sparkles and one is more lacy)
Scissors
Knitting needle, pencil, or something pointy to poke ribbon into wreath
Craft Glue
Hot Glue Gun
Spiders (I got a few different types just for fun)
Any other decorations you want (I got an LED black sparkly pumpkin. I chose not to use the bats in the picture, and had to get more spiders and ribbon than what are pictured)
Halloween spider-webbing (the stuff you stretch and put on trees, etc)
Lighter

Step 1: Cut your orange ribbon and orange sparkly ribbon into lengths that are at least 7/8" long, but no more than 1 1/4" long. You want them to be square-ish.
Step 2: IF you notice your ribbon fraying, use the lighter to lightly burn the ends. It will melt the ribbon and prevent fraying
Step 3: Place a small drop of craft glue on the back of each piece of ribbon
 Step 4: Use your knitting needle or pencil to poke the ribbon into the wreath, glue side down. If you chose to get 2 types of orange ribbon, make sure to space them out so that the second type has room to be placed.

 Step 5: Continue with the craft glue and poking the ribbons into the Styrofoam until the front, inner edge and outer edge are completely covered. Randomly place both plain and sparkly ribbons so that they are evenly distributed.
 Step 6: Create your black spider "web" with the thin black ribbons. To secure, place a dot of craft glue on the back of the wreath, poke the end of the ribbon in, and place hot glue on top. String your ribbons in whatever way you desire, securing the other end the same way as the first. DO NOT use all of your black ribbon...you will need some to create the hanging strap.

Step 7: Cut and place your white spider webbing (if desired). You don't need much...and you don't even have to secure this other than wrapping it around your wreath in any way you like.


Step 9: Place your hanging strap. Wrap one end of the black ribbon around the wreath...tie in the back, poke into Styrofoam and secure with hot glue. When your strap is the desired length, secure the other end in the same way.
All done! Enjoy!
-------------------------------------------------------------
Ribbons and Spiders Halloween Wreath

Supplies:
1 Styrofoam Wreath (I got an 18" wreath)
Orange Ribbon at least 7/8" wide. (I ended up having to get 4 rolls of this. I got the Celebrate It Basic Basic Ribbon from Michael's. I suggest getting wider ribbon...the wider it is the less you will need.)
Sparkly Orange Ribbon at least 7/8" wide. (I ended up having to get 4 rolls of this. I got the Celebrate It Basic Basic Ribbon that sparkles from Michael's)
Thin Black Ribbon (The other tutorial specifies fringe ribbon. I just got 2 kinds of thin ribbon because I didn't like any of the fringe ribbon I saw, one sparkles and one is more lacy)
Scissors
Knitting needle, pencil, or something pointy to poke ribbon into wreath
Craft Glue
Hot Glue Gun
Spiders (I got a few different types just for fun)
Any other decorations you want (I got an LED black sparkly pumpkin. I chose not to use the bats in the picture, and had to get more spiders and ribbon than what are pictured)
Halloween spider-webbing (the stuff you stretch and put on trees, etc)
Lighter

Step 1: Cut your orange ribbon and orange sparkly ribbon into lengths that are at least 7/8" long, but no more than 1 1/4" long. You want them to be square-ish.
Step 2: IF you notice your ribbon fraying, use the lighter to lightly burn the ends. It will melt the ribbon and prevent fraying
Step 3: Place a small drop of craft glue on the back of each piece of ribbon


Step 7: Cut and place your white spider webbing (if desired). You don't need much...and you don't even have to secure this other than wrapping it around your wreath in any way you like.


Step 8: Place your spiders and other decorations. Secure them with adequate amounts of hot glue.
Step 9: Place your hanging strap. Wrap one end of the black ribbon around the wreath...tie in the back, poke into Styrofoam and secure with hot glue. When your strap is the desired length, secure the other end in the same way.
Tuesday, October 18, 2011
Spirals and Lines Reversible Beanie Pattern
--------------------------------------------------------------
Spirals and Lines Reversible Beanie


What you need:
Lightweight yarn-It took me about 1/3-1/2 a skein...lots of yarn (I used Caron Simply Soft, it's still a bulkier hat, but meant for colder weather)
H hook (or hook size needed to obtain desired size)
G hook
Scissors
Yarn needle
Stitches Used:
DC=Double Crochet
BPdc=Back Post Double Crochet*
FPdc=Front Post Double Crochet*
SC=Single Crochet
* For help with these stitches, see video labeled "FPdc and BPdc Instructions" at the end of the post.
All Sizes
*I will try to add other sizes, but in general you can adapt the pattern fairly easily by reducing number of stitches per round, number of rounds, and a smaller hook size. When adapting the pattern, use my Sizing Knit and Crocheted Hats Post for help. On this hat, the spirals should be about 2/3 the total length of the hat, and the lines should be about 1/3 the total length.
Pattern is written so that parentheses contain 1-3 year sizing
Round 1: Magic Loop. Ch 3 (Does not count as first DC). 10DC in loop (12 DC in loop)
Round 2: 1 BPdc and 1 FPdc in each st around. 20DC (24DC)
Round 3: *2 BPdc in next st, 1 FPdc in next st* Repeat from *30DC (36DC)
Round 4: *2 BPdc in next st, FPdc in next 2 sts* Repeat from * 40DC (48DC)
Round 5: *2 BPdc in next st, FPdc in next 3 sts* Repeat from * 50DC (60DC)
Round 6: *2 BPdc in next st, FPdc in next 4 sts* Repeat from * 60DC (72DC)
Go to instructions for your desired size as specified below
6-12 Month
Rounds 7-13: *BPdc in next 2 sts, FPdc in next 4sts* Repeat from * (60DC)
This is where it gets confusing. Starting with Row 7, you want each set of FPdc to start one stitch before the set of FPdc in the previous round. That way, the "swirl" pattern of the main body of the hat continues around. Let me know if this isn't clear...it's hard to explain. if you look at the close up picture below it may help. This means that the beginning of each round may only have 1 BPdc between the last set of FPdc in the previous round and the first set of FPdc in the next. That's OK...you won't really be able to tell when the rounds are done. The important thing is to make sure the swirl continues around.
 |
| This picture applies for rounds 7-13 and round 14 |
On the next two rounds, the sets of FPDC will decrease by 1. You will now do each set of FPdc starting in the same stitch as in the previous row, so that one side of each set will go straight down, and the other will decrease at an angle.
Round 15: Start the set of FPdc in the same st as in the previous round: *FPdc in next 2 sts, BPdc in next 4 sts*. Repeat from * (60DC)
Round 16: Start the set of FPdc in the same st as in the previous round: *FPdc in next st, BPdc in next 5 sts*. Repeat from * (60DC)
Rounds 17-24: *FPdc in next st, BPdc in next st*. Repeat from * (60DC)
Make sure your FPdc lines up with the previous row's FPdc. From here on out you want your FPdc and your BPdc to go in vertical lines straight down the hat. See detailed picture.

Round 25: SC in each stitch around (60SC)
Round 26: Go down 1 hook size. SC in each stitch around. (60SC)
Finish hat by using an invisible join. If you need help with this, see video labeled "Invisible Join" at the bottom of the post.
Fasten off and weave in all ends
1-3 Year Size
Rounds 7-16: *BPdc in next 2 sts, FPdc in next 4sts* Repeat from * (72DC)
This is where it gets confusing. Starting with Row 7, you want each set of FPdc to start one stitch before the set of FPdc in the previous round. That way, the "swirl" pattern of the main body of the hat continues around. Let me know if this isn't clear...it's hard to explain. if you look at the close up picture below it may help. This means that the beginning of each round may only have 1 BPdc between the last set of FPdc in the previous round and the first set of FPdc in the next. That's OK...you won't really be able to tell when the rounds are done. The important thing is to make sure the swirl continues around.
Round 17: Start the set of BPdc in the same stitch as the previous round's BPdc, do as follows: BPdc in next 2 sts, FPdc in next 3 sts, *BPdc in next 3 sts, FPdc in next 3 sts*. Repeat from * (You will end with 2 BPdc) (72DC)
On the next two rounds, the sets of FPDC will decrease by 1. You will now do each set of BPdc starting in the same stitch as in the previous row, so that one side of each set will go straight down, and the other will decrease at an angle. (That's poorly written and I know it...reference the picture or message me if you need help)
Round 18: Start the set of BPdc in the same st as in the previous round: BPdc in next 2 sts, FPdc in next 2 sts, BPdc in next 4 sts, *FPdc in next 2 sts, BPdc in next 4 sts*. Repeat from *, (you will end with 3 BPdc) (72DC)
Round 19: Start the set of BPdc in the same st as in the previous round: BPdc in next st, FPdc in next st. *BPdc in next 5 sts, FPdc in next st *Repeat from * (72DC)
Rounds 20-: *FPdc in next st, BPdc in next st*. Repeat from * (72DC)
Make sure your FPdc lines up with the previous row's FPdc. From here on out you want your FPdc and your BPdc to go in vertical lines straight down the hat. See detailed picture above.
Round : SC in each stitch around (72SC)
Round : Go down 1 hook size. SC in each stitch around. (72SC)
Finish hat by using an invisible join. If you need help with this, see video labeled "Invisible Join" at the bottom of the post.
Fasten off and weave in all ends
That's it! Please let me know if you have questions. You can message me on here, or if you found this pattern through Ravelry you can message me there. Thanks for looking!
FPdc and BPdc Instructions
Invisible Join Instructions
Thursday, October 13, 2011
Limited Time Coupon Code for Etsy
I've decided to do a coupon on my Etsy site specifically for my blog visitors/followers. From now until November 30th, using the coupon code CalMfollower will give you 10% off anything in the Creations A La Mode Etsy Shop. Ordering by Nov. 30 should ensure that anything you order will get to you in time for the holidays. Thanks!

Wednesday, October 12, 2011
Tag Blanket Tutorial
The inspiration for this came from...well, the desire for something for my son, but I REALLY didn't want to pay whatever ridiculous amount stores wanted for it. I have noticed that my son LOVES sucking on anything small, like ribbons, strings, etc. So, a tag blanket was in order! I think the whole thing (minus monogramming and additional embroidery, I'm kind of obsessed with my new sewing machine) took me about 30 minutes, give or take. I'm pretty happy with the results. Here we go!
---------------------------------------------------------
Tag Blanket Tutorial

Materials Needed:
2 19"X19" pieces of fabric (I used nursery flannels, so it's nice and soft)
72" of ribbon (I bought 2 spools so there would be variety). Ribbon should be at least 3/4" wide
Sewing machine
Coordinating Thread
Knitting Needle or turning tool
scissors
lighter
straight pins
Step 1: Cut your ribbon into 3" lengths.
 Step 2: Using your lighter, lightly burn the cut edges of ribbon to melt them. This way the ends will not fray.
 Step 3: Finger press your pieces of ribbon in half. Each piece should now be 1 1/2" long.
 Step 4: Arrange your ribbons on the first 19"X19" piece of fabric. The fabric's right side should be up, and the raw edges of your ribbons should be even with the raw edges of the fabric. Pin ribbons in place.
 Step 5: Place second piece of fabric on top, right sides together. Pin in place, making sure that you are pinning the ribbons. Leave a 4"-5" opening unpinned. (I took the pins holding each ribbon and re-pinned using those, that way you only have one set of pins to worry about.
Step 6: Sew around edges, leaving the 4"-5" opening unsewn so that you are able to turn the blanket right side out. Use a 1/2" seam allowance.
Step 7: Cut corners, making sure not to cut your seam.

Step 8: Turn. Use Knitting needle or turning tool to poke out corners.
Step 9: Pin the opening shut, making sure to pin through any ribbons that were not sewn on.

Step 10: Top stitch as close to edge as possible around entire blanket.
That's it, you're done! I chose to do some extra embellishments, like adding my son's name to one corner and adding a special embroidery stitch around the edges, but those are purely decorative and optional. Have fun!
---------------------------------------------------------
Tag Blanket Tutorial
Materials Needed:
2 19"X19" pieces of fabric (I used nursery flannels, so it's nice and soft)
72" of ribbon (I bought 2 spools so there would be variety). Ribbon should be at least 3/4" wide
Sewing machine
Coordinating Thread
Knitting Needle or turning tool
scissors
lighter
straight pins
Step 1: Cut your ribbon into 3" lengths.
Step 6: Sew around edges, leaving the 4"-5" opening unsewn so that you are able to turn the blanket right side out. Use a 1/2" seam allowance.
Step 7: Cut corners, making sure not to cut your seam.
Step 8: Turn. Use Knitting needle or turning tool to poke out corners.
Step 9: Pin the opening shut, making sure to pin through any ribbons that were not sewn on.
Step 10: Top stitch as close to edge as possible around entire blanket.
That's it, you're done! I chose to do some extra embellishments, like adding my son's name to one corner and adding a special embroidery stitch around the edges, but those are purely decorative and optional. Have fun!
Tuesday, October 11, 2011
Coming Soon: October 2011 Edition
I've been slacking lately. OK, not really, but I've grossly miscalculated the supplies I will need for one craft, and had to special order fabric for another. So, here's what's coming soon:
Tomorrow, 10/12/2011: Tag Blanket tutorial.
Next Wednesday, 10/19/2011: Ribbons and Spiders Halloween Wreath. It will look something like this (but with my own special type of flare):
And (hopefully) on Wednesday, 10/26/2011, a fall-themed table runner. I don't have a picture, because I'm going to be making this one all on my own, and I still have to get some additional fabric and embellishments.
I still have to figure out what I want to do for November. I cannot guarantee that in November there will be all tutorials...sometimes I like to just show off what I've done! And other times I have spent so much time on a crochet pattern that I want to sell it rather than offer it for free...sorry!
See you all tomorrow!
Wednesday, October 5, 2011
Reposted from Colorado Mama Chic: Twine-Wrapped Monogram
I got this tutorial from my friend Andrea's blog over at Colorado Mama Chic. She's been posting a lot of cute ideas for the home lately (as well as some super-adorable clothing and accessory ideas) so please, check her out!
-------------------------------------------------------------


-------------------------------------------------------------
Have you ever thought...Man, I wish I had a Twine-Wrapped monogram for my wall?? Well, then you're in luck! That's today's craft! I seriously dig this little thing & it looks so cute on my wall! Hope you try it out!
-------------------------------------------------------------------------------------------------
What you need:
- Cardboard Monogram {JoAnn has these for $3.99, but you can find a coupon almost anywhere for $1 off or 20% off. Look around & you'll find one}
- Jute Twine {JoAnn for $2.49 - I only needed 1 spool, but others have needed 2}
- Hot glue gun {you WILL burn your fingers}
- Fabric for your flower
- Black felt
- Black 1 1/2" ribbon
- Scissors
-------------------------------------------------------------------------------------------------
Begin by cutting pieces of twine & cover the end pieces.
Be sure to wrap over your ends or funky spots.
Once the bottoms are covered, begin wrapping around the letter. I put my glue lines in spots where you can't really see them if you are up close - like the bottom or the back, and I didn't do it every time I wrapped. Use your judgment & just make sure you pulling tight & the twine is sticking where you need it to stick - so that it's covering the cardboard. {Learn from my mistake & wrap any pieces that cannot be wrapped as you are moving steadily around the letter.}
Once you hit a corner, you will need to wrap it a few times & glue down a couple times to make sure it stays in place. Continue wrapping around the letter once your corner is covered. Make sure there is no cardboard showing!
Grab your fabric, cut about a 1 1/2" strip {I cut at the top of the fabric & tear to give it a more shabby look}
Tie a knot at one of the ends.
Place a drop of glue on one of the sides of the knot, twist your fabric, & secure it to your drop of glue.
Continue twisting & gluing until you have about an inch of fabric left. Glue down the remaining piece to the back of the flower.
Take your black felt & cut out a couple of leaves.
Decide where you want your flowers & glue them onto your letter.
Take your black ribbon & decide how long you'd like your letter to hang - I used about 12". Tie the two ends in a knot & hang. {I used a push pin to tack it onto my wall under the ribbon where it can't be seen.}
Subscribe to:
Posts (Atom)