Wednesday, August 31, 2011

Brought to you from January, 2011...just a month before my son was born. This tutorial is great, but please make note of the adjustment notes I've made, I hope it will help someone else make this even better!
_____________________________________________________________

One of the lovely ladies on a website I'm on posted a link to a tutorial on how to make your own car seat cover of course I had to try it out! I was planning on simply throwing a blanket over the seat to keep Monkey covered when necessary, but this way he doesn't get hit in the face with a blanked and the handle is kept out, so it's a win-win!

I also have to give myself props on the color selection. Somehow I managed to match the red in the car seat almost exactly, which I love. Just a couple of things about this tutorial:

1) To give yourself an easier time with the seams, etc. I suggest using 1/2 inch seam allowances rather than the 1/4 inch suggested.

2) Remember that most of the measurements in the tutorial are for the FINISHED project, so in order to have seam allowances as stated you have to add that length to each cut piece of fabric.

3) On the straps: I just made them about 8" long AFTER they were sewn and both ends closed. This meant that in order to place them correctly on the car seat cover, you just fold each in half, mark the halfway point with a crease or fabric pencil, and then sew it in 2 places: 1/2" to either side of the middle crease.

4) Also, when placing the straps, I think that were I to make this one again I would place them closer to the center. They are placed 11 1/2" from the outer edges (sides, not top & bottom) of the cover. I personally would put them closer to 13" in. They slip just slightly down the sides of the car seat handle when sewn 11 1/2" in, and I think just a little closer to center would be better.


5) The directions for placing the straps are a little vague: I marked the distance in and down on the main body of the car seat cover, then placed the straps by finding the exact middle of the strap and matching that point to my mark, then sewing on my pre-drawn lines.

6) If you are piecing the main body of the cover (like I did and as shown in the tutorial) I made the bottom accent (the red) a total of 4" tall. I personally like that amount, but I wanted to give anyone making this an idea of how big that panel is. So, the red on the bottom is 4" and the patterned piece is 38" for a total of 42" in height.

7) The curved corners are a matter of eyeballing it. I think I made mine so that at the deepest point (aka, the point of the square corner to the center of the curve) about 3", and it worked well. I might consider doing about 4" next time to avoid the corners dragging on the ground, but it's pretty even.


I had to include a picture of the cover flipped up, if only because I'm so proud of that color match (OK, almost match, but still). I also love the monkey strap pads that my mom got us. Granted, our car seat came with cushions on the straps already, but these were too darn cute not to use!!!!


post signature

Tuesday, August 30, 2011

Sizing Knit and Crocheted Hats

I have been having issues sizing my hats. I follow the patterns that I have to the letter, but it seems as though the finished product is always too big or too small. Then I found the following information at Crochet Geek's Blog that is going to be SUPER helpful. From this I'll be able to figure out what my gauge is with each stitch (double, single, half double) and my sizing should be much more accurate. The really nice thing? For most of the sizes it includes how tall the hat should be, so you don't end up with a hat that's so short it won't stay on or so long that the poor recipient cannot see! I have added preemie sizes that I found at This Site so we have the whole spectrum covered!

Here's the chart


  •   Preemie

o   1-2lbs=
§  Head Circumference 9”-10”
§  Hat Circumference 7.5”-8”
§   Length 3.5”-4”
o   2-3lbs
§  Head Circumference 10”-11.25”
§  Hat Circumference 8.5”-10”
§   Length  4”
o   4-5lbs
§  Head Circumference 11.5”-12.5”
§  Hat Circumference 9”-11.5”
§  Length 4”-4.5”
o   4-5lbs
§  Head Circumference 13”-14”
§  Hat Circumference 11.5”-13”
§  Length 5.5”-6”

  •         Newborn

o   Head Circumference 13”-14”
o   Hat Circumference 11.5”-13”
o   Length 5.5”-6”

  •      3 to 6 months

o   Hat Circumference 14”-17”
o   Length 6.5”-7”

  • 6 to 12 months

o   Hat Circumference 16”-19”
o   Length 7.5”

  • 12 months to 3 years

o   Hat Circumference 18”-20”
o   Length 8”

  • 3 to 10 years

o   Hat Circumference 19”-20.5”
o   Length 8.5”

  • Teens

o   Hat Circumference 20.5”-22”
o   Length 9”-10”

  • Adult Woman

o   Hat Circumference 21.5”-22.5”

  • Adult Man

o   Hat Circumference 23”-24”


Hope that helps!


post signature

Monday, August 29, 2011

Sock Monkey Hat...for Boys and Girls!

A while back (we're talking around November 2010) I started making sock monkey hats, as seen here modeled by one of my dogs, since my son wasn't here yet!

She wasn't too happy about it, but at least she stayed put! I love this hat, especially because it is so easily customizable. All of the colors can be changed. I think it looks best with the base of white and grey, and then adding accent colors. The braids, stripe, pom pom (or flower) and edging can be done in a variety of colors...I have frequently done the braids with 2-3 different colors of yarn. Here is an examples of a "girl" version:


For sale at the Creation A La Mode Etsy Shop for $15 plus shipping!


post signature

Saturday, August 27, 2011

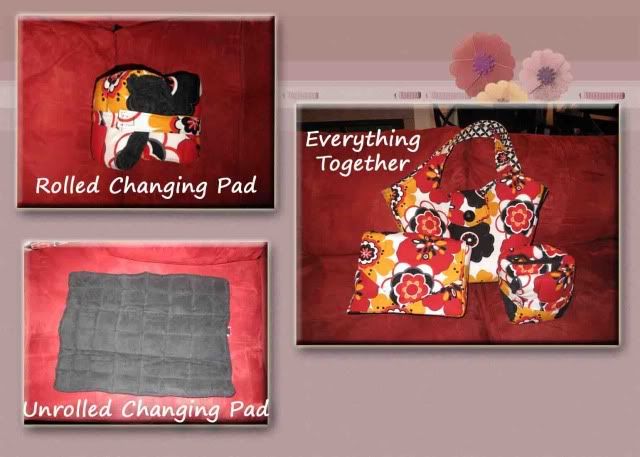
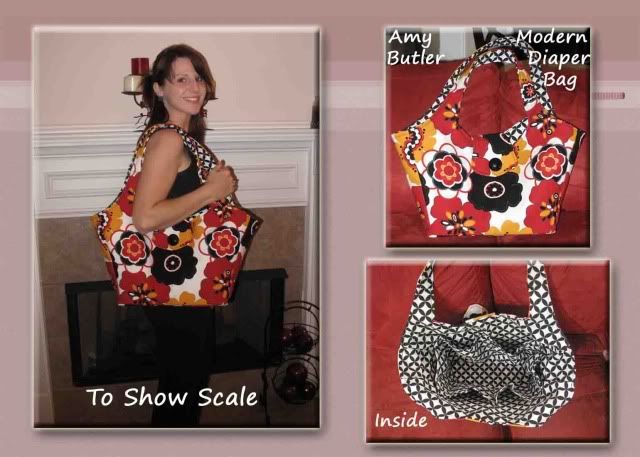
This is a re-post from my "family" blog, but I was very proud of this diaper bag, and even though I have made a second one since then, I still use this all the time (as well as the diaper clutch).

Here it is, straight to you from October, 2010:

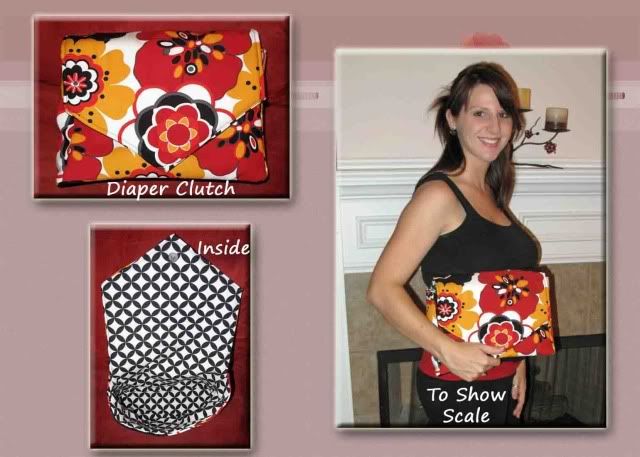
Well, I did it! It's finished! I'm so proud of myself...it took me 4 days, a few machine needles, and more than a few choice words, but it's done! I completed the modern diaper bag, the changing pad that goes with it, and a diaper "clutch" for those times when I don't need the whole big bag with me. I will say that had I kept the dimensions as listed in "Little Stitches for Little Ones" it would have been WAY too big for me. Also, the changing pad does call for 2 layers of batting, but if you buy the thick batting you only need one.(editor's note: the pattern for this does NOT specify a batting thickness, so use discretion) I used 2 layers of 3/4" batting and it's too bulky...I had to lengthen the strap on the changing pad to make it work (but that could also be because I don't like just rolling it into a tube, I tri-fold one way and then another). I used the instructions from The Ogden's Modern Diaper Bag Post to cut down the size of the bag to about 75%, which works perfectly for me.


I had some difficulty turning the bag from inside-out to right side-out, until I realized that I had attached the straps wrong (way to go pregnancy brain and exhaustion) but once I fixed that there wasn't really a problem at all. I also intended the clutch to be smaller, but I was guessing at dimensions and it turned out too big. That's OK, now I just have a small diaper bag (aka clutch) to take with me when the full sized bag would be too much. Is anyone else surprised/impressed that Captain Caffeine helped pick out the fabric? He says that it was so that he could get out of the fabric store faster, but I'm still happy. It would have taken me FOREVER to choose if he hadn't stepped up!


Can you believe I was actually 5 1/2 months pregnant at this point?
Even with the clutch, you can only barely see the beginning of my belly!

Unfortunately, the changing pad was sacrificed to the garbage gods. After only a month of use (and only used a few times) I decided that it was too bulky, not to mention my not-so-great stitching on it started to come undone. I might try again in the future...but until then a well-spent $10 at Target gave me a changing pad that works great!


post signature

Friday, August 26, 2011

The Spartan Helmet to Start Us Off!

Here we go! The first thing I'm super proud of and want to share is the Spartan Helmet. I created this from scratch, since at the time I could only find knitting patterns (and I didn't know how to knit...still learning). My husband wanted our son to have one, and the only way that was going to happen was to create one myself!

So here it is, in all of it's glory. I'm not currently trying to sell this one on Etsy, but I am selling the pattern at Ravelry.com for $3.99.

I'm very thankful that my son wasn't in too bad a mood to model that day. I'll try to get more "artistic" pictures of things, but (as we all know) photography is not my forte!


post signature

Thursday, August 25, 2011

Welcome to Creations A La Mode!

I'm so excited to start this blog up. It's a way to connect for me to with others over crafting, be it crochet, knitting, sewing, or any other type of craft that you or I may do! I will be posting different creations I have made here, so that it doesn't take over my other blog, and I hope that some interest in my personal handiwork will come about. Thanks for looking!


post signature