My first official Etsy order (well, official in the sense that it's from someone I don't know. I have had friends, etc order directly from me after looking on Etsy, but this one was legit!) was for 2 of my Football Beanie. Great! I started on them right away, and I think they turned out pretty well.
The tutorial I started with is at Mommies Crochet. After working the pattern the first time (not for this order, the first one was for my son), however, I noticed that the beanie turned out a little short. So I started adapting the crochet pattern to meet the measurements I listed in my Sizing Hats post. This time they definitely ended up longer, and (as a result) I'm sure they will fit and look much better. Thanks so much to April for the initial pattern! I have posted results for comparison below.
This was made from the original pattern
And this was after I added a couple rows to the middle. I think I would even
add at least one more row to the bottom.
I wrote this because I needed a hat for a newborn and a 6-12 month infant. The 3-6 month size was created out of that, since I passed the sizing needs for that. Note that I have not actually made the 12 Month-3 Year or the 3-10 Year size, so the rounds for these are estimated. If I ever need to make those sizes, I will update the pattern to reflect any changes that need to be made and I will update hat measurements.
Please do not reproduce or sell this pattern. I like it to be free, but I also want credit for creating it! Feel free to sell anything you make from this pattern, but make sure to include on your listings and with your finished product that the pattern was courtesy of Stephanie at Crafty Capable. Thanks!
Supplies Used:
Bernat Satin Yarn in Tangerine
Bernat Satin Yarn in Ebony
Lion Brand Fun Fur Eyelash Yarn in White
Small amount of Bernat Satin Yarn in Snow
H hook
G hook
Stitches Used:
SC: Single Crochet
HDC: Half Double Crochet
Sl st: Slip stitch
SC2tog: Single Crochet 2 together See Video Here
*Note: You will be hooking 2 rows of orange and one row of black down the length of the hat. To avoid fastening off each color as you finish the row, carry the unused color through by pulling the used color underneath it before completing your sl st at the end of each row. This will only be an issue at the completion of the first of each set of 2 orange rows, so that your black yarn carries through. It will not be visible when you turn the hat right side out.
Round 1: Begin with your orange (aka tangerine) yarn and create a Magic Loop. Ch 2, and make 8HDC. Join with a sl st. to 2nd chain of CH2. (8HDC)
Round 2: Ch 2, DC in same st as sl st and next st, *2 HDC in next*. Repeat from * around. Join with a sl st using black yarn. (16HDC)
Round 3: With black (aka ebony) yarn, Ch 2, DC in same st as sl st and next st. *2HDC in next, HDC in next st*. Repeat from * around. Join with a sl st using orange yarn. Ch 2, turn. (24HDC)
Round 4: With orange yarn, HDC in same st as sl st and next 2 sts. *2HDC in next, HDC in next 2 sts.* Repeat from * around. Join with a sl st. (32HDC)
Round 5: Ch 2, DC in same st as sl st and next 3 sts. *2HDC in next, HDC in next 3 sts.* Repeat from * around. Join with a sl st using black yarn.. (40HDC)
*For Newborn size, continue to newborn sizing instructions. Hat will measure approximately 3.5" in DIAMETER and approximately 11.5" in CIRCUMFERENCE at this point.
Round 6:Ch 2, With black yarn, HDC in same st as sl st and next 4 sts. *2HDC in next, HDC in next 4.* Repeat from * around. Join with a sl st using orange yarn. (48HDC)
*For 3-6 month size, continue to 3-6 month sizing instructions. Hat will measure approximately 4.5" in DIAMETER and 13" in CIRCUMFERENCE at this point.
Round 7: Ch 2, ith orange yarn, HDC in same st as sl st and next 5 sts. *2HDC in next, HDC in next 5 sts.* Repeat from * around. Join with a sl st. (56HDC)
*For 6-12 month size, continue to 6-12 month sizing instructions. Hat will measure approximately 5.5" in DIAMETER and 16" in CIRCUMFERENCE at this point.
Round 8: Ch 2. HDC in same st as sl st and next 6 sts. *2HDC in next, HDC in next 6 sts.* Repeat from * around. Join with a sl st using black yarn. (64HDC)
*For 12 month-3 year size AND 3-10 year size, continue to 12 month-10 year sizing instructions. Newborn Size
Rounds 6-14: Beginning with black yarn in row 6 (the color of the yarn you use will be determined by where you are in the tiger striping), Ch 2, DC in next st (not the same st as the sl st) and in each st around. This includes the st at the base of your CH1.(40HDC)
*Please note, you will be continuing to alternate 2 rows of orange and 1 row of black to achieve the tiger striping. After finishing, the newborn size will measure approximately 5.5" in HEIGHT and approximately 12.5" in CIRCUMFERENCE.
Fasten off and weave in ends. Tighten Magic Loop. Continue to Ear Flap Instructions.
3-6 Month Size
Rounds 7-18: Beginning with orange yarn in row 7 (the color of the yarn you use will be determined by where you are in the tiger striping),Ch 2, HDC in next st (not the same st as the sl st) and in each st around. This includes the st at the base of your CH1 (48HDC)
*Please note, you will be continuing to alternate 2 rows of orange and 1 row of black to achieve the tiger striping. After finishing, the 3-6 month size will measure approximately 6.5" in HEIGHT and approximately 14.5" in CIRCUMFERENCE.
Fasten off and weave in ends.Tighten Magic Loop. Continue to Ear Flap Instructions.
6-12 Month Size
Rounds 8-16: Beginning with orange yarn in row 8 (the color of the yarn you use will be determined by where you are in the tiger striping), Ch 2, DC in next st (not the same st as the sl st) and in each st around. This includes the st at the base of your CH1 (56HDC)
*Please note, you will be continuing to alternate 2 rows of orange and 1 row of black to achieve the tiger striping. After finishing, the 6-12 month size will measure approximately 7" in HEIGHT and approximately 18" in CIRCUMFERENCE.
Fasten off and weave in ends.Tighten Magic Loop. Continue to Ear Flap Instructions.
12 Month-10 Year Size *Note: These two sizes are the same except for the length. Please be aware that you will finish the 12 Month-3 Year size after round and the 3-10 Year size will be completed after all rounds are completed.
Rounds 9-20: Beginning with black yarn in row 9 (the color of the yarn you use will be determined by where you are in the tiger striping), HDC in next st (not the same st as the sl st) and in each st around. This includes the st at the base of your CH1 (64HDC)
*Note: fasten off for 12 Month-3 Year size. For 3-10 Year size, continue to final rounds below.
Rounds 9-22: Continuing in the 2 orange/1 black pattern, HDC in next st (not the same st as the sl st) and in each st around. This includes the st at the base of your CH1 (64HDC)
Fasten off and weave in ends.Tighten Magic Loop. Continue to Ear Flap Instructions.
Ear Flap Instructions
*This part of the pattern is written with the newborn instructions first, then the subsequent sizes in parentheses separated by commas. It will look like this: Newborn (3-6mo, 6-12mo, 12mo-3 years, 3 years-10 years). When the rounds start to differ, the round numbers will look the same way.
Round 1: With the hat right side out and the back seam facing you, count 4 (4, 5, 5, 5) to the left of the seam. in the 5th (5th, 6th, 6th, 6th) stitch join your yarn, continuing the pattern of rows that you used in the main body of the hat. (i.e.: If you had just completed your black row, you would join orange yarn). SC in same st as join and next 9 (11, 14, 14, 14) sts. Ch 1, turn. 10SC(12, 15, 15, 15)
*Note: on the last stitch of rows where you will be switching color, do the following: insert hook into stitch, YO and pull through, YO USING NEW COLOR and pull through both loops on hook. Ch 1, turn. You will have to fasten off your orange yarn at the end of each set of orange rows, but you can carry the black through.
Rounds 2-4 (2-5, 2-6, 2-7, 2-7): Alternating colors in the same pattern as the hat (2 orange, 1 black) SC in same st as CH1 and each st across. 10SC (12, 15, 15, 15)
Continue reducing each row by 2 until you have completed a row with 4SC (or 5, for the sizes with odd numbers of stitches in the rows.) Fasten off and weave in ends.
Second Ear Flap
For second ear flap, with right side out and back seam facing you, count 14sts (16, 20, 20, 20) from back seam and attach yarn (in appropriate color to continue the pattern. Follow ear flap instructions for the second ear flap.
If your final round on the second ear flap is with black yarn, DO NOT FASTEN OFF. Weave in all other ends and continue to finishing instructions at the end of the pattern. If the final round on second ear flap is not with black yarn, fasten off, weave in all ends, and attach black yarn, Continue to finishing instructions.
Edging Instructions
With G hook and black yarn from second ear flap, SC in each stitch around the perimeter of hat, making sure to hook around the black yarn that you carried through along the edges of the ear flaps. Fasten off.
Leaving a 12 inch (14, 15, 15, 16) tail, attach black and orange yarn at the tip of one ear flap. SC in each stitch around. Fasten off, leaving another 12 inch tail.
Cut 11 24 inch (28, 30, 30, 32) sections of black and orange yarn (total of 22 lengths of yarn). separate them into 2 bundles, one containing 6 of each color and the other containing 5 of each color.
Ears (Make 2)
These are worked in the round, use stitch markers if you need to. As with the ears, the different sizes are noted in parentheses.
Using Orange Yarn and H hook:
Round 1: Make a magic loop. Ch1, 6SC (6, 8, 8, 8) in loop. 6SC (6, 8, 8, 8)
Round 2: 2 SC in each st around. 12SC (12, 16, 16, 16)
Round 3: *1SC in next, 2SC in next*. Repeat from * around. 18SC (18, 24, 24, 24)
Round 4: Ch 1, turn. SC in 1st chain from hook and in next 6 sts (6, 8, 8, 8). 3SC in next st. SC in next 6 sts (6,8, 8, 8). 3SC in next, SC in next 3 sts (including base of CH1 st) (3, 5, 5, 5). Sl st to first stitch in the row, then fasten off, leaving a very long tail. You will need enough to go around 2/3 of the ear later on. Tighten Magic Loop.
Repeat Rounds 1-3 with White Eyelash Yarn and G hook. Fasten off. Tighten Magic Loop.
*Notes on working with eyelash yarns: crochet LOOSELY. It can be difficult to see your stitches otherwise. When you slip stitch this section to the orange section, some of the "eyelashes" will get caught in the stitches. If you want a cleaner look use your yarn needle to pull them out and then trim them to desired length.
Weave in center end of orange and both ends of white eyelash. Use the ends of the eyelash to fill in any gaps you may see in the loose crochet when weaving in. Trim to desired Fluffiness.
Now, using the long tail of orange, SC around 2/3 of the edge of eyelash and orange sections, making sure white is centered in the orange and that you are stitching through both sections. Remember to put 3 stitches at the "points." If you did not leave a long enough tail, fasten off the orange when you are almost out, weave in ends, and attach orange yarn again. Continue until white is attached to orange, and leave a long enough tail to sew ear to hat. Repeat with other ear.
Muzzle (Make 2)
Using Eyelash yarn and H hook
Round 1: Make a Magic Loop. Ch 1, 8SC in ring (8SC)
Round 2: 2SC in each st around(16SC)
Round 3: *1SC in next, 2SC in next*. Repeat from * around. (24SC)
Round 4: *1SC in next 2 sts, 2SC in next*. Repeat from * around. (32SC)
For Newborn-3 Month and 3-6 Month sizes, fasten off, leaving enough of a tail to sew the muzzle onto hat. Tighten Magic loop.
Round 5: *1SC in next 3 sts, 2SC in next*. Repeat from * around. (40SC)
Make sure to trim your muzzle to desired fluffiness.
Nose
Use Black Yarn and G hook
Round 1: Ch 3. SC in 1st st from hook and next 2 sts (Make sure you are crocheting in wrong side of stitch). (6SC)
Note: This is 6SC because you are counting the CH3 ad 3 sts and the 3 sts you worked in the wrong side as 3 STS
Round 2: Working around the point where you started your Ch3, SC in next 2 sts, 2SC in next 2 sts, SC in next 2 sts. Sl st to first st in round.(8SC)
For Newborn-3 Months, Fasten off. Leave a long enough tail to sew onto hat
Round 3: SC in same stitch as sl st and next 3 sts. 2SC in next 3 sts. SC in last 2 sts and the sl st. Sl st to first st in row. Fasten off, leaving a long enough tail to sew nose to hat. (13SC)
Eyes
Using Black yarn & G hook (for Newborn-3 Months and 3-6 Months) or H hook (for 6-12 Months, 12 Months-3 Years, and 3-10 Years)
Round 1: Make a Magic Loop. 6SC in the loop (6, 8, 8, 8). Sl st to join. Fasten off. 6SC (6, 8, 8, 8)
Now switch to White Yarn.
Round 2: Insert hook in same st as Sl st. 2SC in same st and next 2 sts. (2, 3, 3, 3). Sl st in next st. 6SC (6, 8, 8, 8) +1 Sl st
Round 3: TURN WITHOUT CH1. sl st in first SC. *SC in next, 2SC in next* 2 times (2 times, 3 times, 3 times, 3 times). Sl st in next, Sl st in next (will be a black st). Fasten off. 6SC (6, 9, 9, 9) +3 sl sts.
Finishing
Almost done now! Using a yarn needle, sew on your facial features. Make sure you sew the muzzle on BEFORE you sew the nose on.
Once all facial features are on, using black yarn sew on 3 whiskers on each side of muzzle, if desired.
You're done! I know it's a long process, especially with the eyelash yarn, but I think the end result is worth it! Enjoy!
For Halloween this year, I didn't want to spend any money on my costume, and decided to go as a 1950's housewife/pin up girl. I did a pin up photoshoot for my husband last year for our anniversary, so I have the hair and make-up know how, and the wardrobe (for the most part). The only thing I was really missing was a Snood. Lucky for me, they're pretty easy to make! I used This Tutorial, but found it a little difficult to follow, so I adapted it into wording that worked better for me. I also did mine a bit smaller than the other tutorial, because it seemed like it would be too long for the amount of hair that I have.
-----------------------------------------------------
Supplies:
Small amount of yarn (probably about 2 oz)
D Crochet hook
Thin elastic headband
1 yd. Gosgrain Ribbon for bow (optional)
Round 2: TC in 12th chain from hook. *ch 4 sts, skip 4 sts, TC in next st*. Repeat from * to end of chain, TC in last st. Turn
Round 3: Ch 9. TC in 1st TC of last row that you come to. *Ch 4, TC in TC of last row.*. Repeat from * until you have TC'd in last TC of previous row. Ch 4, TC in 5th st of turning chain, ch 4, TC in same st as last TC. Turn.
Rounds 4-8: Repeat Round 3.
Round 9: Ch 9. TC in 1st TC of last row. *Ch 4, TC in next TC*. Repeat from * until you have TC'd in last TC of previous row. Ch 4, TC in 5th st of turning chain. Turn.
Rounds 10-16: Repeat Round 9
Round 17: Ch 5. TC in 1st TC of last row. *Ch 4, TC in next TC*. Repeat from * until there is 1 TC left in previous row. Ch 4, YO 3 times. Hook into next TC in previous row. YO, pull through (5 loops on hook). YO, pull through 2 loops on hook 3 times (leaves 2 loops on hook). YO 3 times, hook into 5th st of turning chain, pull through (6 loops on hook). YO, pull through 2 loops 3 times (leaves 3 loops on hook). YO, Pull through all 3 loops (This is a TC dec for the purposes of this tutorial). Turn.
Rounds 18-20: Ch 5. TC in 1st TC of last row. *Ch 4, TC in next TC*. Repeat from * until there are 2 TC's left in previous row. TC dec between those two TC's.
Finishing: SC around the headband, working 2 SC's into each "mesh" space you created. (aka 2 SC's between each set of TC's around).
You can sew on the bow at what will be the top of your snood if you want.
I saw This Hat when browsing for everyday beanies on Ravelry and really wanted to make it. Unfortunately, the pattern is on someone's personal blog, and that blog is in Finnish (I think) and has not been translated into English. When I tried to translate, I discovered that A) the pattern starts from the bottom of the hat and works to the top and that B) it would be less work to just write a similar pattern myself. This is slightly different from that other pattern, but I still like it. This particular pattern is written for the 6-12 month and 1-3 year sizes (and it's a long hat), but I may add other sizes as my son gets bigger. Sorry I didn't use a lighter colored yarn...it would have shown the details better. Here you go!
--------------------------------------------------------------
Spirals and Lines Reversible Beanie
Pattern is worked in the round, without joining rounds. Use stitch markers if necessary.
What you need:
Lightweight yarn-It took me about 1/3-1/2 a skein...lots of yarn (I used Caron Simply Soft, it's still a bulkier hat, but meant for colder weather)
H hook (or hook size needed to obtain desired size)
G hook
Scissors
Yarn needle
Stitches Used:
DC=Double Crochet
BPdc=Back Post Double Crochet*
FPdc=Front Post Double Crochet*
SC=Single Crochet
* For help with these stitches, see video labeled "FPdc and BPdc Instructions" at the end of the post.
All Sizes
*I will try to add other sizes, but in general you can adapt the pattern fairly easily by reducing number of stitches per round, number of rounds, and a smaller hook size. When adapting the pattern, use my Sizing Knit and Crocheted Hats Post for help. On this hat, the spirals should be about 2/3 the total length of the hat, and the lines should be about 1/3 the total length.
Pattern is written so that parentheses contain 1-3 year sizing
Round 1: Magic Loop. Ch 3 (Does not count as first DC). 10DC in loop (12 DC in loop)
Round 2: 1 BPdc and 1 FPdc in each st around. 20DC (24DC)
Round 3: *2 BPdc in next st, 1 FPdc in next st* Repeat from *30DC (36DC)
Round 4: *2 BPdc in next st, FPdc in next 2 sts* Repeat from * 40DC (48DC)
Round 5: *2 BPdc in next st, FPdc in next 3 sts* Repeat from * 50DC (60DC)
Round 6: *2 BPdc in next st, FPdc in next 4 sts* Repeat from * 60DC (72DC) Go to instructions for your desired size as specified below 6-12 Month
Rounds 7-13: *BPdc in next 2 sts, FPdc in next 4sts* Repeat from * (60DC)
This is where it gets confusing. Starting with Row 7, you want each set of FPdc to start one stitch before the set of FPdc in the previous round. That way, the "swirl" pattern of the main body of the hat continues around. Let me know if this isn't clear...it's hard to explain. if you look at the close up picture below it may help. This means that the beginning of each round may only have 1 BPdc between the last set of FPdc in the previous round and the first set of FPdc in the next. That's OK...you won't really be able to tell when the rounds are done. The important thing is to make sure the swirl continues around.
This picture applies for rounds 7-13 and round 14
Round 14: Start the set of FPdc in the same stitch as the previous round's FPdc, do as follows: *FPdc in next 3 sts, BPdc in next 3 sts*. Repeat from * (60DC)
On the next two rounds, the sets of FPDC will decrease by 1. You will now do each set of FPdc starting in the same stitch as in the previous row, so that one side of each set will go straight down, and the other will decrease at an angle.
Round 15: Start the set of FPdc in the same st as in the previous round: *FPdc in next 2 sts, BPdc in next 4 sts*. Repeat from * (60DC)
Round 16: Start the set of FPdc in the same st as in the previous round: *FPdc in next st, BPdc in next 5 sts*. Repeat from * (60DC)
Rounds 17-24: *FPdc in next st, BPdc in next st*. Repeat from * (60DC) Make sure your FPdc lines up with the previous row's FPdc. From here on out you want your FPdc and your BPdc to go in vertical lines straight down the hat. See detailed picture.
Round 25: SC in each stitch around (60SC)
Round 26: Go down 1 hook size. SC in each stitch around. (60SC)
Finish hat by using an invisible join. If you need help with this, see video labeled "Invisible Join" at the bottom of the post.
Fasten off and weave in all ends
1-3 Year Size
Rounds 7-16: *BPdc in next 2 sts, FPdc in next 4sts* Repeat from * (72DC)
This is where it gets confusing. Starting with Row 7, you want each set of FPdc to start one stitch before the set of FPdc in the previous round. That way, the "swirl" pattern of the main body of the hat continues around. Let me know if this isn't clear...it's hard to explain. if you look at the close up picture below it may help. This means that the beginning of each round may only have 1 BPdc between the last set of FPdc in the previous round and the first set of FPdc in the next. That's OK...you won't really be able to tell when the rounds are done. The important thing is to make sure the swirl continues around.
Round 17: Start the set of BPdc in the same stitch as the previous round's BPdc, do as follows: BPdc in next 2 sts, FPdc in next 3 sts, *BPdc in next 3 sts, FPdc in next 3 sts*. Repeat from * (You will end with 2 BPdc) (72DC)
On the next two rounds, the sets of FPDC will decrease by 1. You will now do each set of BPdc starting in the same stitch as in the previous row, so that one side of each set will go straight down, and the other will decrease at an angle. (That's poorly written and I know it...reference the picture or message me if you need help)
Round 18: Start the set of BPdc in the same st as in the previous round: BPdc in next 2 sts, FPdc in next 2 sts, BPdc in next 4 sts, *FPdc in next 2 sts, BPdc in next 4 sts*. Repeat from *, (you will end with 3 BPdc) (72DC)
Round 19: Start the set of BPdc in the same st as in the previous round: BPdc in next st, FPdc in next st. *BPdc in next 5 sts, FPdc in next st *Repeat from * (72DC)
Rounds 20-: *FPdc in next st, BPdc in next st*. Repeat from * (72DC) Make sure your FPdc lines up with the previous row's FPdc. From here on out you want your FPdc and your BPdc to go in vertical lines straight down the hat. See detailed picture above.
Round : SC in each stitch around (72SC)
Round : Go down 1 hook size. SC in each stitch around. (72SC)
Finish hat by using an invisible join. If you need help with this, see video labeled "Invisible Join" at the bottom of the post.
Fasten off and weave in all ends
That's it! Please let me know if you have questions. You can message me on here, or if you found this pattern through Ravelry you can message me there. Thanks for looking!
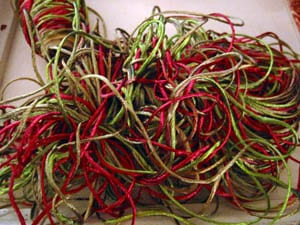
This is such a cute blanket when finished! It's the first one I've made that has 3 skeins of yarn going at the same time, continuously. It's not as difficult as I thought it would be, but definitely not super fun either!
Were I to make it again, I would try to add some nicer edging. I feel like the straight edges look unfinished...and I'd want to spruce it up a bit. But, overall, I'm very proud of how it turned out, especially since there were times that I felt my yarn looked like this:
Now that I've made it (and know that I can do it) I am selling it over at Etsy. It's $30.00 plus shipping.
A while back (we're talking around November 2010) I started making sock monkey hats, as seen here modeled by one of my dogs, since my son wasn't here yet!
She wasn't too happy about it, but at least she stayed put! I love this hat, especially because it is so easily customizable. All of the colors can be changed. I think it looks best with the base of white and grey, and then adding accent colors. The braids, stripe, pom pom (or flower) and edging can be done in a variety of colors...I have frequently done the braids with 2-3 different colors of yarn. Here is an examples of a "girl" version:
Here we go! The first thing I'm super proud of and want to share is the Spartan Helmet. I created this from scratch, since at the time I could only find knitting patterns (and I didn't know how to knit...still learning). My husband wanted our son to have one, and the only way that was going to happen was to create one myself!
So here it is, in all of it's glory. I'm not currently trying to sell this one on Etsy, but I am selling the pattern at Ravelry.com for $3.99.
I'm very thankful that my son wasn't in too bad a mood to model that day. I'll try to get more "artistic" pictures of things, but (as we all know) photography is not my forte!


